Love it or hate it, cable management is needed for any workspace. Let’s dive into it.
So you’ve bought a new desk. Maybe it’s a standing desk. Maybe it’s a fixed height desk. You’ve got all your devices setup. Everything is perfect… on top. Underneath its a rat nest of cables going everywhere and anywhere but everything “works”. So you say “it’s good enough.”
If this sounds like you, then this article is just what you need. In this article we will discuss Cable Management. Why we need it. Why you hate it. What can be done about it. How to service it. What products can be used to help tidy up the one thing everybody hates.
You need to budget for it..
That’s right. When you laid out your setup you probably put hours upon hours choosing your gear, headsets, monitors, but when everything came, the cable management oversight was suddenly clear.
That brings us to my first piece of advice. Budget. I’m not going to tell you how to budget in this blog, but know that you need to start somewhere. At the simplest form, it could be you pulling a number out of thin air. Assuming you don’t need cables like USB-C or Thunderbolt, Then you just budget for the things you need to tidy it up. That budget could be $50 to $400 + if you’re planning to leverage fancy trays, connectors or holders. It depends on what you’re looking for and working with.
Mark your Territory
Now that you’ve got your budget, you need to figure out what you need. This starts with laying out the desk. If your desk is assembled and you have not started placing things on your desk, rough in anything underneath that might cover space on the bottom. Monitor arm mounts, lights, under desk accessories like chargers or drawer mounts if they will have cables running to them for things like laptops, or docking stations.
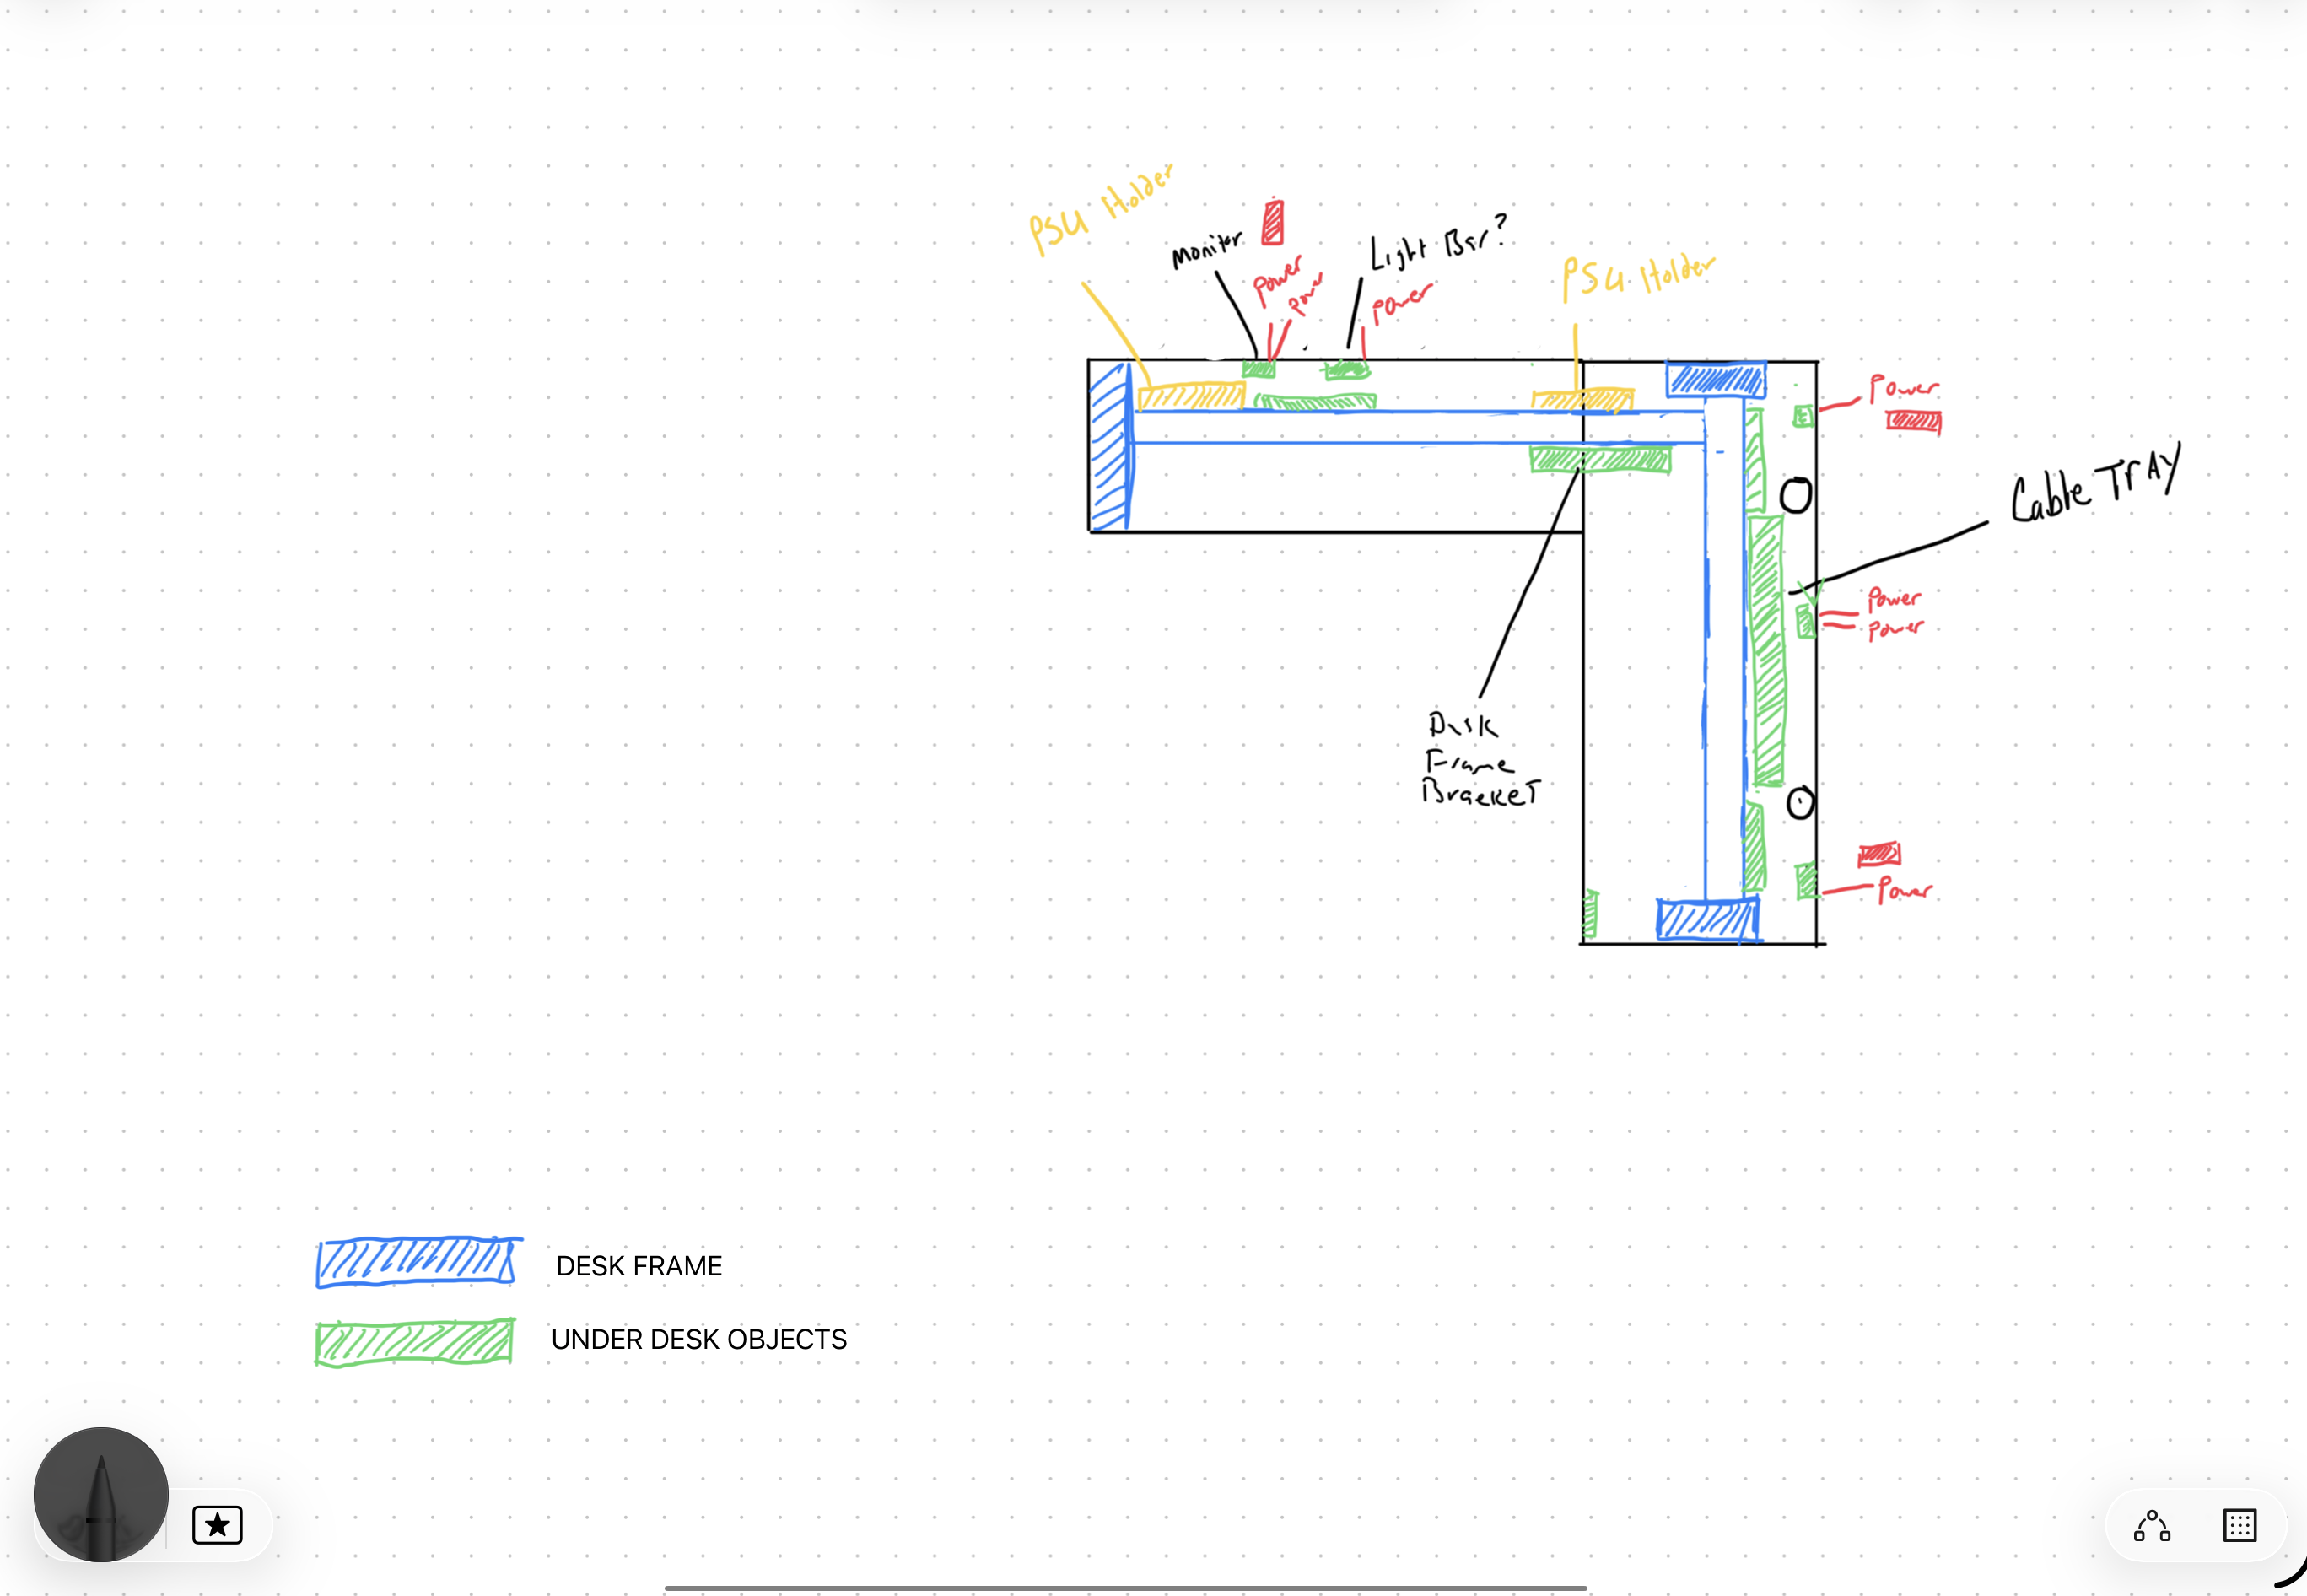
The rough in could be something simple like placing the item on the desk underneath and marking the underside. If you want to see it in more detail, using apps like OneNote or FreeForm or just regular paper and pencil to sketch out the desk placement and items. In the example below, I did a quick sketch of an old Sit/Stand desk underside to get an idea of placement. Whether digital or analog, I prefer Square or Dot Grid paper to help with alignment, measurements etc. but the “what” you use is up to you. If it’s free, use it.
If you’ve got everything mounted on your desk, disconnect all your cables. Take note of anything that’s too short, too long, or in some cases not used. The not used cables could be those that you left in the rats nest and just disconnected to remove something old to make way for something new. Having all these cables hanging down allow you to separate them and put them together which we will get into in a later section.
Knowing where everything is coming from and going to will lead you right into the next part. Cable routing and accessories.
Hold my… Cables
There are a million cable channels and organizers out there so we won’t go into brands etc. in detail though we should talk about the method of managing your cable situation. The premise is to route your cables using raceway, velcro zip ties, if you’ve got metal legs or metal frame, then magnetic cable holders, etc.
It’s important to consider yourself in this piece. Do you change things out a lot? Do you set it and forget it? Do you add things later? All these questions help lay the ground work for your desk and accessories.
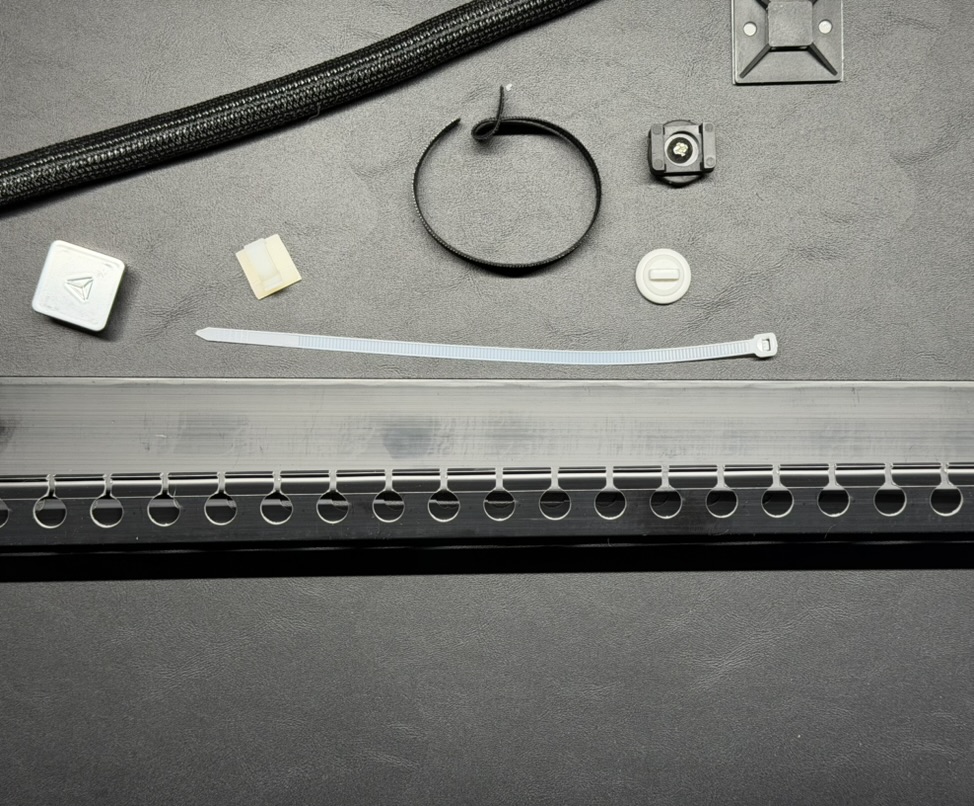
Here’s a short list of what I consider essential when it comes to cable management:
- Velcro zip ties over your standard issue zip ties
- magnetic cable holders
- Raceway if needed (Color matched to the frame if possible)
- Flexible cable sleeves
- Cable spine for power to the wall
- Desk mounted Power Strips
- (Optional) Regular Zip Ties (Selective Use or Avoid)
A note on regular old zip ties…. These are a pain in the neck to deal with. Every time you need to change something with your desk, you need to cut one and replace it again. This is pretty wasteful not to mention annoying. I recommend using these sparingly and ONLY for hiding cables that you never touch. A perfect of example of this is with standing desks. You will probably never ever touch or reroute the cables for the legs or the controller of the desk. They’d be acceptable for use in my opinion. Otherwise, investing in velcro zip ties will save your high blood pressure for other parts of life and the flexibility you get with these are worth the investment.
Power to the Standing Desks
Standing desks are all the rage so it’s no surprise they create a different set of rules specific to these types of products. There’s some basic rules to follow when it comes to Standing Desks. This won’t be an exhaustive list as standing desk specific work is coming soon, so let’s stick to a few basics.
- It moves. Pay attention to how you want to connect devices
- Use a cable spine to create a clean look
- Alternatively use magnetic cable holders on the desk if you have this and not a cable spine
- Keep the amount of things on the floor as minimal as possible. The more things on the floor requiring cables, the more you have to worry about getting snagged, breaking, or unplugging
- Be mindful of weight distribution
- Invest in good cable trays
Standing desks can be very tricky to cable correctly. Part of that reason is because underneath, there’s not always good mounting options or ways to more easily hide the cables without a lot of work. Always budget for additional cable management tools with standing desks.
Raceways… Need or Nahhh?
Cable raceways are very common in IT work. They create channels that allow for proper routing, separation of power and data and can add a finished look when used properly. These are more of a personal taste so whether you use them is totally up to you. When you buy them for your desk, here’s a few things to keep in mind if you decide to go that route:
- Pay attention to the number of cables that need to go into the raceway. Not all raceway is created equal
- Check reviews and look for information about removing the cover of the raceway. This helps you identify the ease of use for the product.
- Check the length and depth of the raceway. If they are super deep, they hold a lot of cables but will noticeably create weird visual lines underneath the desk unless its in place across the length of the desk from leg to leg
- Color match the raceway to the desk frame where possible
Power Bricks are the worst…
Take inventory of the number of Power bricks you have. See if there’s specific mounts available for them so you can place them on the underside of the desk. It’s best if you can mount them but that may not always be an available option. The Caldigit Ts4 and TS5 Thunderbolt docks have options for mounting their included brick with their dock. They are 3rd party, but that completely fine for this type of work. The other thing you can do is choose a cable tray with a holder that has a potential holder for those large power bricks as well. Either way, you need to find a way to place them so that they don’t smack you in the face when/if you decide to make a change.
Cable Lengths will Kill a Great Setup…
As a person who has been obsessed with clean cabling since I was a teenager, cable lengths can kill the most well thought out desk design. Short cables will frustrate you right out of the gate. Many times a manufacturer will include cables that are woefully insufficient in length and quality. They have to include them as it’s expected but the truth is they are just checking a box with 0 regards on whether it’s actually the right type or length. To make them even more hideous, they throw ridiculous stickers on the cables they do include that just look like 💩. I recognize that there may be laws particular to states or countries calling for this and should be removed by the user but man are they horrible to see. Here’s how I recommend you handle cable lengths:
- Check reviews of cables to see how well they work
- Use extensions where it makes sense but be mindful of how these affect performance
- Avoid extensions on Display cables
- Whatever length you think you need, double it. If you think 6ft/3m will work, then get a 10ft/5m cable
Wrapping it up with a Cable Tray and Sleeves
You will inevitably need a place to put excess cables in your setup. Whether that’s in a cable tray or a modesty panel, you’ll need something/somewhere to place your cable excess. When you consider your cables that are visible on your desk in your monitor arms or coming from your monitor, I like to wrap these in some sort of cable loom or sleeve. It just creates a finished look and makes it look cleaner.
I hope that this guide helps provide some pointers when you start planning your desk setups. Anything I’m missing leave a comment.
Links (Non Affiliate).
These are all products I’ve used below and I’ve found them to be decent to good quality. Most are in use on my current desk today:
Cable Raceway: Link
Magnetic Cable Holder Option 1: Link
Magnetic Cable Holder Option 2: Link
Cable Spine: Link
Net Style Cable Tray: Link
No Drill Cable Tray: Link


Leave a comment